Drawing a Simple Space Ship
Tutorial 1 (Drawing with Flash) --- Tutorial 2 (What to Draw - Simple) --- Tutorial 3 (What to Draw - Complex) --- Tutorial 4 (What to Draw - Decorations)
 Hi, I'm Ace the Super Villain, and today I'm going to teach you how to make simple space ships. Why? Because I'm sick of all these geometry shooters and sheep invaders and shoot the fruits. Video games are supposed to be about aliens and zombies and monsters and they thang. It's not that hard, people.
This is going to be geared for people who do not consider themselves "artists". People who do not want to become artists, but still need a space ship here and there for their Flash games. People who may have tried to sketch a spaceship once or twice, but gave up in despair. I think that part of the problem for non-artists is that you see the spectacular finished products of real-artists and the first crappy lines of a rough draft, but none of work that goes inbetween. As a real-artist, let me assure you that I start out with the same crappy lines that you do. The only difference between us is that I know what lies between the Point A of a rough draft and Point C of a finished graphic. Let me introduce you now to Point B.
But first things first, we need to get set up. I'm going to be using Flash because I feel like it, and because I assume that Flash developers have it already. I'm starting a new Flash file for making graphics. Add a new Movie Clip to the library with whatever name you want, we're not programming anything, and jump in. For starts, we'll use the most basics of basic shapes, and rev it up as we go along.
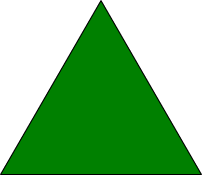
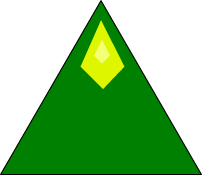
Let's draw a triangle. Switch the Rectangle Tool to the PolyStar tool. In the Properties tab, switch it a 3 sided polygon. Pick the colors you want for lines and fills, default values for things like line width is fine for now. Hold Shift and drag upwards so that you get a nice upwards facing equilateral triangle. Size doesn't matter, it's easy to change later. Here's mine:
Now we're going to take this shape and turn it into a top-view ship. For this simplest of ships, I'm going to achieve this by adding a cockpit, thrusters, guns and some hull markings.
Cockpit first, I'm going to create a new layer within the Movie Clip for it so that I can scoot it around without interfering with the hull. (if you're worried about naming your layers, let's name the first one "hull" and this new one "cockpit") Make sure that the cockpit layer is above the hull layer in the list, so that it shows up. It's also a good idea to lock the hull layer so that you're not drawing on it by mistake. I'm going to disable the lines and set the fill color to a more cockpity color. I personally don't want another triangle for the cockpit, so I'm going to switch the polystar's side count to four and make a diamond. Next I just move the cockpit into position and get this:
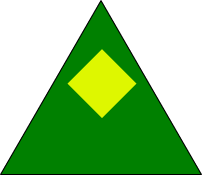
I want to make that cockpit a bit more streamlined, so I'm going to grab the corners and tuck the sides in and the top out. (you can also use the transform tool) For the heck of it, I'm also going to throw in a smaller, brighter diamond to give it a little shine. It now looks like this:
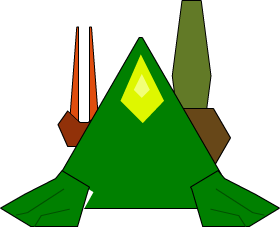
Now for thrusters. Lock the cockpit layer and add a new thruster layer. I'll put it above the hull, but below the cockpit. Just for diversity's sake, let's up the polystar sides to 5 and use pentagons. I'm turning lines on again and going back to the hull color, maybe a bit darker. (feel free to use whatever color you want) I'm going to start with one on the side. Once it's in position, I'm going stretch it downwards with the transform tool, so that it's reaching off of the back. Here it is:
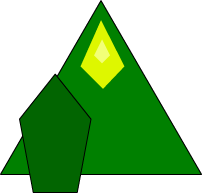
Since I'm going to copy it for the other side, I want to decorate it first. Let's add some vents to the side, just take the line tool and line it up. Once you have a bunch, (copy-paste may be helpful) you can use Modify -> Arrange -> Distribute Heights to get them evenly spread out. I'm also going to rotate them just a smidge with the transform tool because the the thruster isn't perfectly straight. (slant instead of rotate might work too, zoom in if your having trouble manipulating them) I'm just going to draw in a little intake valve using lines towards the front and fill it with a darker shade. I'm going to make a little thrusty colored triangle with the polystar tool off to the side and then flatten it and move it into position. Finally I'm just going to make a dark green line more or less down the middle and fill in the inner side with a darker green. I've now got this:
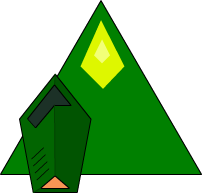
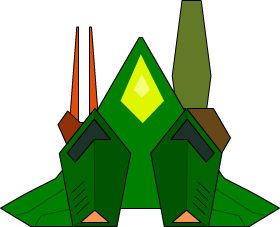
Now I just need to copy it and paste it to the other side, so that there's two of them. Use Modify -> Transform -> Flip Horizontal to switch orientation and then mess around with the Modify -> Arrange features to get them quasi-symmetrical.
Mine now looks like this:
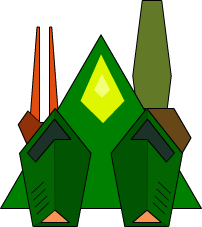
Now to pack some heat. Lock the thrusters layer and add a new one below the hull. I don't want to bother with symmetry this time, so I'm going to add a big gun to the right side, and a pair of lighter ones to the left, starting with the biggy. I want 6 sides on my polystar this time and a new fill color. I'm gonna hold shift and drag it sideways so that the flat edges are pointed up and down, (though the other way could work too) then stretch it upwards and move it into position. Then I'm just gonna stick another hexagon on top of it to make it a little more interesting. It looks like this:
I should probably shade that in a bit like I did with the thrusters, but I don't care. Feel free to do it yourself.
Next I'll add the smaller guns to the left side. I'm getting kinda sick of polystar, so I'm just gonna try freehanding them with the line tool. Hopefully you're getting the hang of picking random shapes that look like things enough to make something yourself at this point. Experimentate, see what looks good, or just copy the gun from the other side. Here's mine:
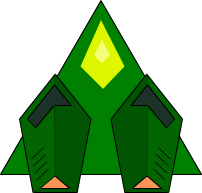
At this point, the hull layer looks really really boring compared to the rest of the ship, so it's time to doll that up too. The plan is to go crazy, so I'd like to copy the hull to a new invisible layer so that I can revert back to the original if I mess things up. (ctrl-shift-v to keep it in the same position)
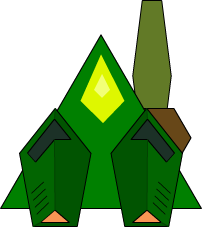
Okay, what to do...? I think first I'd like to add some better looking wings off to the side. I'm basically randomly deforming a hexagon until it looks wingy. This goes here, that goes there, hide the thrusters so I can see around them, there we go. Now I'm just going to line in some wingflaps in dark green. And copy it to the other side. I've also sawed off the very tip of the nose because it's a bit too sharp. Here's what I've got now, with and without the thrusters showing:
(in retrospect, it probably would have been a good idea to add a separate layer for the wings)
Next I want to tuck in the front where it meets the thruster pods. I'm going to use the eraser to break up the line and add a new one facing inwards towards the front of the thruster. Delete the old line and erase the bits of green. (I'm going to make a new line to seperate what I want to keep from what I want to drop, you could also try acrobatics with the eraser) To copy it over, I'm going to select the line segments on the done side, delete the old line from the other side and paste the new one into place (using the auto-lock feature to aline it with the nose). Here's what it looks like now:
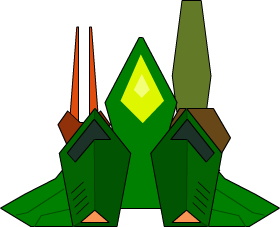
Now I'm just going to add some more dark lines like I did with the wings. At this point I'm not really concerned with symmetry, people aren't going to notice it with a tiny ship in a fast paced game. I'm going to add some colored lines to make it more interesting. Another important thing I'm doing here is to break up the big flat line that makes up the back edge of the ship. Long straight lines are not good for looks. Tada!:
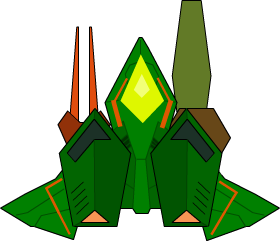
We now have a beautiful new fighter craft ready to blast things to bits. Don't worry if yours doesn't look quite as good as mine, because you're not competing against me, you're competing against geometry wars and sheep invaders. If you do want to compete with me, then keep experimenting and trying out new ways to use new shapes. Don't get discouraged by mistakes. Learn from them and get used to them, because they will never go away. Practice is the main ingrediant of success.
Finally I should discuss how to make use of this graphic. One way is to just use the Movie Clip as is. You can also export this as a raster graphic by going to File -> Export -> Export Image... and selecting the format you want. (I like png because it supports transparencies and doesn't screw up the colors like gif) If you're using this approach, you should think about how you want to resize things. Different programs will resize the graphic differently. Here is what the ship looks like resized in Flash before export:

Resized after export in MSPaint (which I forgot does not support transparencies):

And resized after export in Gimp:

As you can see, the Flash resize is much liney-er than the other two. There are other programs out there, but be aware that whatever you choose will affect the outcome.
Here's the progression from start to finish one more time: